
Cam Levers: How They Work, Where to Use Them, and How to Choose the Right One
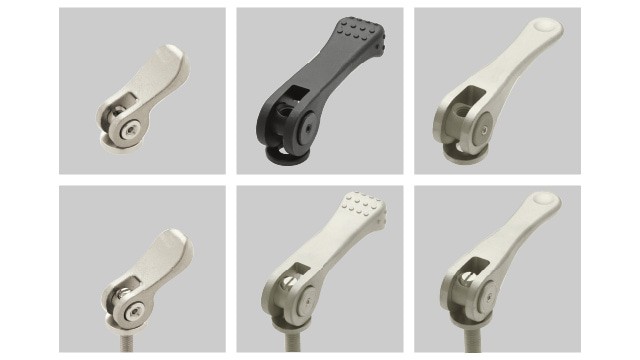
A cam lever is a simple mechanical component that can make clamping, positioning, adjustment, and securing much faster. Instead of repeatedly turning a threaded knob or tightening a nut, an operator moves a lever through a short arc to create a controlled clamping action. This makes cam levers especially useful when equipment needs frequent adjustment or removal.
In practical applications, the right cam lever can improve both convenience and consistency. However, choosing one is not simply a matter of selecting a lever that fits a threaded hole. Factors such as clamping force, available clearance, material, thread size, operating frequency, and environmental conditions can all affect performance.
What Is a Cam Lever and How Does It Work?
A cam lever is a mechanical fastening device that uses an eccentric cam surface to convert lever movement into clamping force. When the lever is raised or rotated, the cam changes its position relative to the mating surface. As the lever moves into its locked position, it presses against the component and holds it securely.
The basic mechanism usually consists of a handle, cam section, threaded stud or mounting shaft, and related hardware. The exact design varies depending on the application.
The main advantage is speed. A conventional threaded fastener may require several turns before it releases. A cam lever can often be locked or released with a single movement.
This makes the mechanism valuable in situations where operators need to make repeated adjustments. Machinery guards, fixtures, workholding equipment, positioning systems, and adjustable assemblies are common examples.
Why the Cam Mechanism Matters
The eccentric shape of the cam is what creates the mechanical advantage. As the lever approaches its final position, the cam moves across the contact surface and generates clamping pressure.
A well-designed mechanism should provide enough resistance to prevent accidental release without requiring excessive force from the operator. The goal is controlled clamping rather than maximum force.
For example, an adjustable fixture on a manufacturing workstation may need to be repositioned dozens of times during a shift. Using a traditional bolt could slow the process. A cam lever allows the operator to release the fixture, reposition it, and lock it again quickly.
How to Choose the Right Cam Lever
Selecting a cam lever starts with understanding the job rather than the component itself. Consider the following factors before ordering or installing one.
1. Determine the Required Clamping Force
Not every application needs the same amount of holding power. A lightweight positioning mechanism may require relatively little force, while an industrial fixture may need substantially more.
Avoid assuming that a larger lever automatically provides a better solution. Excessive clamping force can damage delicate components, deform surfaces, or make operation unnecessarily difficult.
Identify the actual force requirement and select a mechanism designed for that load.
2. Check the Thread and Stud Size
Thread compatibility is one of the easiest details to overlook. A lever may appear suitable but fail to install because the stud diameter, thread pitch, or thread standard does not match the mating component.
Before purchasing, verify:
- Thread diameter
- Thread pitch
- Thread direction
- Stud length
- Available mounting depth
- Required washers or spacers
For replacement applications, measuring the existing hardware is often more reliable than estimating its size visually.
3. Consider Available Clearance
A lever needs enough room to move. This becomes particularly important when components are installed close to walls, machine frames, guards, or other hardware.
Measure the lever’s operating arc before installation. A handle that works perfectly on an open workbench may become difficult to operate when installed inside a compact machine enclosure.
Some applications benefit from a low-profile or adjustable-position handle that can be repositioned after tightening.
4. Select Appropriate Materials
Material selection should match the environment.
Steel provides strength and is suitable for many demanding applications. Stainless steel can be a better choice where corrosion resistance is important, particularly around moisture or harsh cleaning environments. Engineering plastics can be useful when reduced weight, electrical isolation, or comfortable handling is required.
The cam surface deserves particular attention because repeated contact can cause wear. For high-cycle applications, choose components designed for repeated operation rather than occasional adjustment.
Step-by-Step Installation Strategy
Installing a cam lever correctly is straightforward, but a few checks can prevent problems later.
Step 1: Inspect the mounting point.
Make sure the mounting surface is clean, flat, and free from damage. Dirt or burrs can affect clamping consistency.
Step 2: Verify the hardware.
Confirm that the thread, stud length, washers, and mating surface are compatible.
Step 3: Position the component.
Place the parts in their intended operating position before locking the lever.
Step 4: Adjust the lever.
If the design allows adjustment, set the lever so it reaches the locked position with firm, manageable resistance.
Step 5: Test the assembly.
Operate the lever several times. Check that it locks consistently and releases without excessive effort.
Step 6: Inspect under normal conditions.
If the component is used on machinery, test it while the equipment is in its normal configuration. Nearby components may interfere with lever movement.
Common Mistakes and Challenges
One common mistake is choosing a cam lever based only on thread size. Although the thread must match, it does not determine whether the mechanism will provide suitable clamping performance.
Another problem is incorrect adjustment. If the lever is too loose, the assembly may move during operation. If it is too tight, the operator may struggle to lock or release it.
Surface condition can also affect performance. Paint buildup, oil, dirt, or damaged contact surfaces may prevent the cam from seating consistently.
Wear is another consideration. A lever that operates smoothly during initial installation may develop play after thousands of cycles. Regular inspection is particularly important in production equipment where loose components could affect accuracy.
Finally, avoid using a cam lever as a substitute for a properly engineered safety fastener when the application requires positive retention. Quick-release mechanisms are excellent for adjustment, but they should be selected according to the actual safety and load requirements of the assembly.
Practical Tips for Better Performance
For frequently adjusted equipment, keep the lever accessible but outside areas where it can be struck accidentally. A convenient location should not create an unintended release hazard.
Use the shortest practical stud length. Excessive thread protrusion can interfere with nearby components or create an unnecessary snag point.
When several levers are installed on the same machine, consider using consistent handle orientations. This makes the equipment easier to operate and inspect.
Periodically check for looseness, unusual resistance, surface damage, and visible wear. A quick inspection can identify developing problems before they affect the larger assembly.
For high-cycle applications, record when components are installed and inspect them according to operating frequency rather than relying only on calendar-based maintenance. A lever used ten times a year experiences very different wear from one operated several hundred times per day.
If operators frequently report that a lever is difficult to reach or requires excessive force, treat that feedback as useful engineering information. The problem may involve incorrect sizing, poor positioning, insufficient clearance, or an unsuitable clamping mechanism.
Conclusion
Cam levers provide a practical way to secure and adjust components without repeatedly turning conventional fasteners. Their quick operation makes them particularly useful for fixtures, machinery, positioning systems, guards, and other assemblies requiring frequent access.
The best results come from matching the lever to the application. Evaluate clamping requirements, thread dimensions, operating clearance, material, adjustment range, and expected cycle frequency before installation. Proper adjustment and routine inspection are equally important.
When selected and installed correctly, a cam lever can simplify everyday equipment operation while providing reliable, repeatable clamping performance.